A large panel, but easy ...
| FLIGHT CONTROL panel A large panel, but easy ... |
|
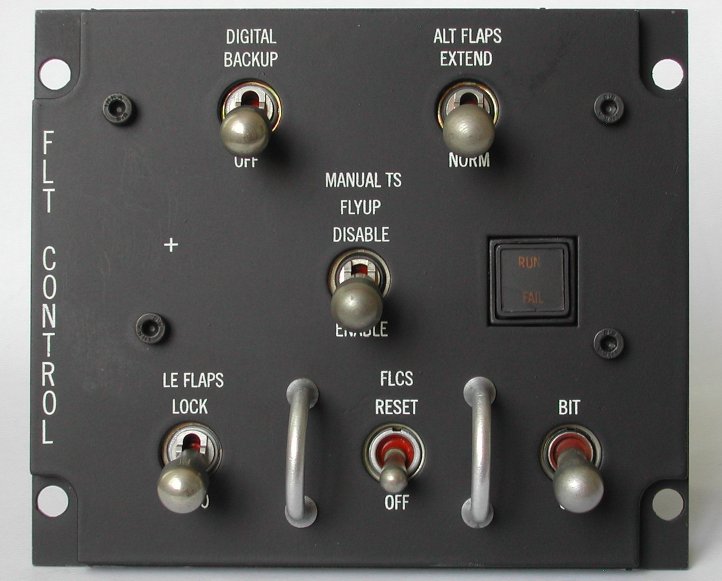
The FLT CONTROL panel is relatively easy to build, it is just a large panel.
The panel has a few switches and one Jay-El indicator which has a separately lit upper halve with the green text
RUN and lower halve with the red text FAIL. Note that the
BIT switch is momentary, but can be magnetically held in its active position.
The Jay-El indicator is not that difficult. The only thing to look for is that the upper halve and lower halve can be lit independent of each other. If the Jay-El already has 2 separately illuminated halves, you only have to put the correct lens on the lamp block, with the "RUN - FAIL" markings. If not, you can modify the Jay-El. Just the two independent lamp connections are essential. Note that this Jay-El is only an indicator, so no push button functionality is needed. If you have a Jay-El with push-button functionality you can choose to ignore it (no connection of the switch) or connect the switch and use it for some (not F-16) action, perhaps some simulation-specific functionality ...?
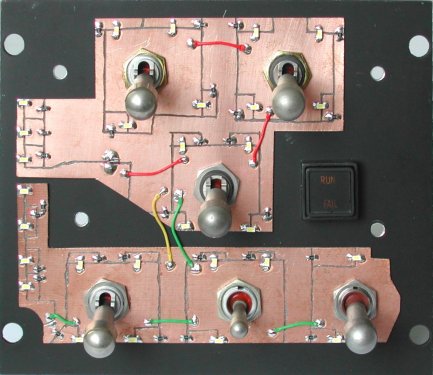
Due to the size of the panel, I decided to implement the backlighting of the panel using two pieces of circuit board. That way I did not have to cut a lot of material from the rear side of the panel.
A complete explanation how the backlighting is realized is described on the AIR COND panel page. So here is just one picture of the FLT CONTROL backplate with the backlighting PCBs and mounted components.
By the way, the "BIT" switch (in the lower righthand corner) is a "mag switch". Its lever has a momentary action, but the switch also has a coil. When the coil is energized, the lever is magnetically held in its activated position until the current through the coil is switched off. These "mag switches" are not cheap, and the one I used on this panel is not completely correct, because the correct one has type F lock. Note that you can also use a "mag switch" with type G lock (just mount the switch 180° 'rotated').
Important
When you cut away material at the rear side of the panel, do not cut away everything.
You must keep a small ridge surrounding the square opening for the Jay-El, otherwise the bright light of the LEDs will be
very visible at all sides of the push-button!
As I did with all other panels, I used the front panel mounting screws at the rear side as studs for a small L-shaped piece of aluminium. The L shape makes it strong even though the metal is just 2 mm thick. So you can push or pull connectors without any bending.